Tables
consist of one or more rows and columns. The rows and columns
together create cells into which you can put text, images,
or even other tables!
Inserting a
table
To insert a table,
select Table from the Insert menu on the Menu bar. The Insert
Table dialog box shown below appears:
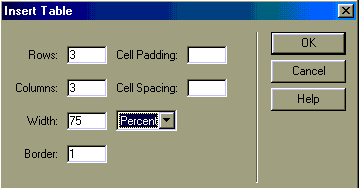
Change
the number of rows and columns to reflect what you need
for your table. You can add and delete rows and columns
after the table is created, if necessary. The Width field
refers to the percentage of the available space in the window
that you want the table to occupy. This too can be changed
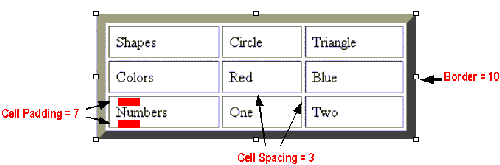
after the table is created. The illustration below explains
which parts of the table layout are affected by the Border,
Cell Padding, and Cell Spacing fields. All of these fields
can be left blank or set to a 0 value.
Editing a table
Many table properties
can be changed from the Property Inspector, once the
table is selected. For example, all of the original
choices (rows, columns, width, border, cell padding, and
cell spacing) made in the Insert Table dialog box can be
altered using the Property Inspector.
Selecting a
table
In order to edit
a table, the entire table or some portion of it (one or
more cells, one or more rows, or one or more columns) must
be selected, just as text must be selected prior to changing
its properties. To select the entire table, hold the Shift
key and click anywhere on the table. When the entire table
is selected, a dark line will appear around the table.

Re-sizing a
table
A table can be
re-sized horizontally, vertically, or both. Select the table
as described above.
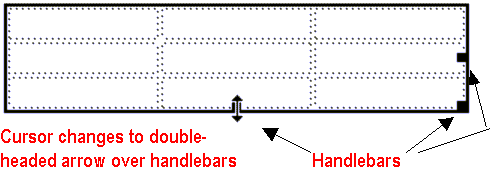
Place the cursor
over one of the handlebars until the cursor image changes
to a double-headed arrow. Click and hold the left mouse
button. Drag the mouse in the direction for which you want
to change the table size (left/right for changing the width
of the table, up/down for changing the height of the table).
Release the mouse button when the table reaches the desired
size.
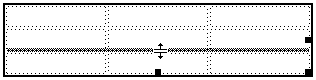
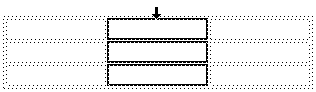
Re-sizing rows
or columns
Place the cursor
over the dividing line between the rows or columns whose
size you want to alter. The cursor changes as show in the
image below. Click and hold the left mouse button. Drag
the mouse in the direction for which you want to change
the row or column size. Release the mouse when the row or
column is the desired size.
Selecting rows
or columns
Select a column
or row by placing your mouse just above (for columns) or
just to the left of (for rows) the table at the column/row
you want to select. The cursor changes to a black, solid
arrow. Click the left mouse button once (and release) to
select the row or column. The example below shows a selected
column.
Adding rows
or columns
- Select the
column to the right of (or the row below) the one you
want inserted. (See instructions for selecting rows or
columns above.)
- From the Modify
menu on the Menu bar, choose Table > Insert Row or
Insert Column.
Columns are inserted
to the left of the selected column. Rows are inserted above
the selected row.
Merging and
splitting cells
You may want
a table in which the number of columns per row or rows per
column is not consistent throughout the table. In this case
you will need to merge one or more cells or split two cells.
To merge cells,
- Select the
cells:
- Place the
cursor in one of the cells.
- Click and
hold.
- Drag the
mouse in the direction of the cells you want to include
in the merge as shown in the picture below.

- From the Modify
menu on the Menu bar, choose Table > Merge Cells.
To
split a cell into 2 or more rows or columns:
- Place the
cursor in the cell to be split.
- From the Modify
menu on the Menu bar, choose Table > Split Cell....
- Complete
the Split Cell dialog box, indicating the number of rows
or columns into which you want to divide the cell.
- Click
OK.
