|
How
to Use the Scanner at the COE Computer Lab
-
Press the leftmost button
located on the front of the scanner. The following screen will appear:

-
Click cancel on
the scanning screen. If you do not do this, the scanner will start
scanning your document using as a file name the last file name used.
Also, the computer will store your document in the last place a document
was stored without giving you the chance to choose a location.
-
Set Image type, Paper size
and Image quality as desired. Keep in mind that to preserve good resolution
in photographs you should set image quality to at least 75 dpi. However,
the higher the image quality number, the more memory you will need
to store your files.
-
Make sure to uncheck:
-
Highlight the File
name box and type the name you would like to use to save your
document.
-
Keep Save as type
as JPEG when scanning photographs and TIFT when scanning black and
white objects (tables or text).
-
Click  right next to Macintosh HD:
2001-… right next to Macintosh HD:
2001-…
By doing so, you will be able
to save your file wherever you want it. Choose to save your file to the
desktop, to a floppy disk, or to a zip disk, as shown in the next screenshot:
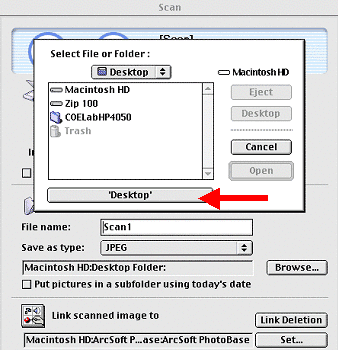
For example, if you want to
save your file to the desktop, then you have to click on the white area
below Trash. Then, Click on Desktop as indicated with the
red arrow.
-
Click 
-
Click 
and wait for the Scanning bar to reach 100%. Now you are done scanning
your document. If you want to see how this file will look,
- Click cancel.
The Scan screen will close.
- Now look for your file
(on the desktop, your floppy disk, or your zip disk) and open it.
Once you click the file icon, your file will automatically open
in Photoshop.
To Scan Another Document
-
After having scanned the
first document, the following window will be on your screen:

-
You have two possibilities:
-
On the screen above,
click on Scan-1, as is shown with the red arrow. The scan
screen will appear. Follow steps 3 to 9 of the previous section.
-
Press the leftmost
button on the front panel of the scanner. The scan screen will
appear. Follow steps 2 to 9 of the previous section.
|